Writing Samples
Skilled writing seems to be scarce among many visual effects companies. If a pitch presentation is to have memorable impact on the reader, then a good writer is very helpful in winning jobs. A combination of technical understanding and skill in communication with words can be a powerful asset to a pitch, a team and a company. Here are some examples of Les’ writing, created for specific purposes.
These two pieces were written for different purposes, several years ago. One presents the case for CG over Practical Effects in a specific case, and the other was an educational piece for a client uncertain about visual effects and the process of their creation. Both achieved their goals.
Methodologies:
This is a very brief overview of the visual effects methodology for Michelin spots with Bibendom appearing in them. We have re-created this 107-year-old advertising icon for several spots and have increasingly streamlined and refined the way we create him and integrate him into scenes.
Michelin: Bibendon, Digital over Practical:
The first several spots we helped create relied on a “Guy-in-a-Suit” approach. Several suits were built under our supervision, replaced as they aged. We developed the pipeline and methodology for animating the head and face, and integrating the animation into shots of the suit-performer. This approach had the benefit of making Bibendum’s interaction with objects and his presence in the environment indisputably real, but the need for clean-up on the suit and compositing of the head animation made for a difficult post process. The results were very good, but the suit had serious limitations in story and production. The character could not fit into confined spaces like a car, and could only perform basic movements before looking awkward. For these reasons in the last several spots we have developed and used a completely CG character. This allowed for further refinement of his physical design and proportions. We improved the character animation rigging as well.
We have nearly eliminated the need for the “Guy-in-a-Suit” approach. This is still an option, but the need for clean-up, and the fact that the head was always CG animation for expression performance reasons, have made the new CG character set-up a very efficient and directable solution. Now the character can be scaled to fit in a car or other more confined space, can perform in ways a suit performer cannot, and can speed the shooting process. The Director can still have a stand-in wearing all white perform in the shots, and clean passes may not always be required. Performance drivers can be used, and if planned carefully, objects can be handled.
The use of a stand-in for Bibendum is recommended, and they should wear all white close-fitting clothing for lighting and reflection reasons. For close-up shots where Bibendum’s hands may need to hold things like a steering wheel or a tool, the suit gloves should be used. These are white silicone sculpted gloves that conform to the character’s very specific design.
The process of character animation and rendering begins with the tele-cine tapes of the selects from the approved edit. We bring these online and begin tracking the camera. Animation begins and the character’s performance
refined according to Agency and Director’s feedback. The lighting of the character is created from HDR photography taken during the shoot. The textures of the character are base on the “papery’ look of the suit and the original Michelin character specs. As animation approaches approval the renders are composited in the Flame and elements are added. Reflections, shadows, dust, water, bounced light (he is white, after all!) are added as necessary. The prime effort is always performance. Bibendum’s facial and physical expressions are very carefully created to convey just the right character personality. The importance of this focus cannot be overstated because the character’s persona is very clearly and carefully defined and must be preserved. He is never confused, or sad, or upset. He is always positive, team-oriented, up-beat and helpful. These are some of the defined character guidelines that are very important to Michelin.
The CG character has proven to be versatile, believable and efficient to produce. The use of a stand-in and the need to shoot some clean plates has proven to be faster and more directable on location than a suit performer and support crew. The presence of a visual effects supervisor and a tracker from Digital Domain is necessary at the shoot to help production make the tricky calls when shooting for the character, and other visual effects features of the spot. This is an efficient and productive set-up, and has been proven several times over in the recent past.
We hope this has been helpful, but please feel free to call us with any questions you ay have about this and other visual effects challenges. Thank you for including us at this early stage. It will help you achieve greater production value, and to make the right production decisions surrounding this tricky character.
(This approach was indeed adopted and remains in place today)
Visual Effects “How-To”
An example of an article written for the reader with no knowledge of VFX:
Featuring: POCARI Sweat
“Underwater Tennis”
Tennis? Underwater?? Well, it can be done! Here’s how:
We began this process with the director and his storyboards. These were very specific and detailed each shot. These boards were evaluated as to how they could be done, and how they SHOULD be done. Our general policy is that “ If it CAN be shot, it SHOULD be shot”. All elements that could be handled as live action were then deemed live. All other visual elements such as trees, fog, location, bubbles, ball trails and particles in the water would become CG or composited elements. We then went through the boards and decided which frames, or elements in the frame, needed to be shot “Wet-for wet”, or underwater, and which could be shot “Dry-for-wet” on a stage. That left the remaining shots that must be shot underwater. Once this process of distinction between practical filming and post-production effects has been completed, we can begin to execute the work.
There are many components to the spot that may look like real things but in fact are digital. Some are a combination. Some digital elements started out as live images. This sounds confusing, because it is. Let’s look at one typical shot:
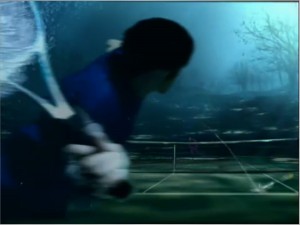
Here we see a foreground player on a court with his opponent, a ball trail, and a background with fog. The foreground player had to be shot in the water for realism. He was shot on a greenscreen (they DO work underwater too!). The bubbles on his racket are real plus digital. We fed air into the racket frame, and added CG animated bubbles to make them denser. The ball, trail and court are CG animated, and the net is a photo of a net “projected” onto geometry in the computer and “waved” gracefully for interaction. The opponent is shot on a stage with air blowing strongly on him from below, and shot at a high frame rate for that slow underwater motion. The background is primarily CG, with the trees from still photos shot at a park near Digital Domain, and the hills and grass digital. The trees are simply “projected” onto geometry too. The fog is digital, as are the rays. Each shot has it’s own needs and breaks down differently.
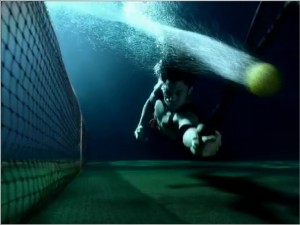
Here we see a player underwater, and a ball that is a filmed element (shot hovering on an air stream spinning) and a CG bubble trail. The court and net are just photography on stage, and the background added in compositing.
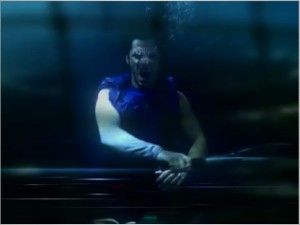
In this shot a foreground net is shot on greenscreen, and the player underwater also on green. The background is handled the same as the others. The rack focus is handled in compositing.
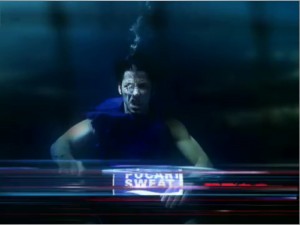
There is another piece of this puzzle to be explained: CG Animation!
The tennis ball is often CG animation in this spot. The process of creating a CG animated image starts with design. A design is created I any medium preferred. From paper and pencil, to 3D modeling and Photoshop paintwork: All are acceptable. Once a design is approved a model is built. This consists of pure geometry. It is a mathematical description of a 3-dimensional object, or ‘.obj’. The modeling process can take several weeks for complex objects such as a detailed building or a sleek and detailed car. This file is then surfaced and textured. Surfacing describes the qualities of the surface. Glossy? Sandy? Furry? The details of how the fuzzy tennis ball will react in the water must be considered. Highlights are suppressed underwater, and there is a certain softness to the light. These must be created too. The color and pattern are texture maps, literally maps of the globe wrapped around the ball. This can be quick, or take a week or longer for things like hair or fur. The motion of the ball is controlled by a different part of the program (Lightwave in this case!). The motion of an object is potentially complex. Every subtlety of movement must be created. There are three dimensions, and three axes of travel and rotation. If the ball is meant to travel in a certain space, that space may need to be created as well. We made a CG court for the ball to bounce off of, and the net to react to the wake. Though this example is simpler, complex animation can take well over a week or two per 2-second shot.
Tracking is a critical part of the process. It refers to the process of reproducing the exact behavior of the camera in a live shot, including motion, rotations, focus, depth of field and lens distortion. The photography on stage was done on a small court set with greenscreens all around. We surveyed the dimensions of the court and net and used that data to reconstruct the court in CG. This is because when animation is rendered in the computer, it must match the scene for which it is intended. Animation is rendered to a CG “camera” and it must match the live camera precisely. If it does not, sliding, weird scale issues and lack of realism can result. A moving camera has presented challenges, but is now much easier to achieve with CG animation because tracking, and especially our award winning software, has become much more powerful. Tracking takes a week or two but can run parallel to other phases of post-production effects work. Animation cannot begin in earnest on a photographic plate without a track.
Tracking yields a “camera” that tells the computer how to see the 3D object. The render will need a lighting set-up to illuminate the object. The lighting of the render can be set up in a few ways. There are two most common. An artist can set up individual lights to approximate the lighting in a scene, perhaps guided by photos and notes. This can be successful, but for more complex lighting effects a special form of photography is used called “High Dynamic Range” photography. This is a set of digital photos shot during production at very high resolution. They usually are taken with a 180-degree fish-eye lens in two or more directions. They are shot in two or more directions to create a complete sphere of images to capture the entire environment. All exposures are captured, from completely overexposed to black. These are then compiled in a special program or plug-in to make an H.D.R. set-up. This will provide the exact lighting from the scene and reflection maps too. The results of these renders are often striking in their realism.
Renders are created on black, and come with one or more mattes. These mattes are used during compositing to prevent the rendered object from appearing transparent. Special mattes are often created to control different parts of the render. Compositing, or the combining of images, is an art. Here the different elements of the scene are combined to form a convincing reality. Here is an example of many different elements composited together to form the scene.
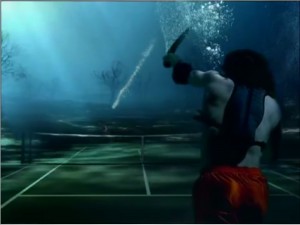
Here we see the players about to begin the volley. The foreground player is shot wet, greenscreen. The court is a render of a CG court. The trees are on “Cards” digitally rendered, but come from photos. The opponent is shot at high frame rate, “Dry” on stage with water rippled lighting and air. Bubbles shot as separate elements on a black background are added as highlights only and tracked to the racket, which has some too. The rays are made in the Flame compositing platform, and are not 3D. These are all color corrected to match, blurred and rippled, fog effects added as a function of distance from the CG camera, and blended with the image elements of the shot. These are then rendered as a composite and the result of many iterations, taking up to a week or more for a complex shot, to yield this comp’. Other things a compositor can do is move on the frame, like a push-in or slide-up, but these are limited by resolution because a shot will have to be enlarged first to allow room for movement. They can also add vignettes for drama and focus, soften, diffuse, and add a myriad of 2D visual effects available as filters, “sparks” (special Flame dedicated effects plug-ins), elements like dust, rainfall, dirt, scratches, particles, and debris, or any of hundreds of other enhancements. You can see how the possibilities are endless here too.
The final step in finishing a spot is often laying in titles, end cards, supers and legal text. In this case, the final end animation sequence was provided to us, as is often the case, by the Client. The Flame compositor superimposes the animation or image, does any adjustments necessary or requested, and adds legal text in the appropriate places and sizes, supers like website addresses, and any other graphics provided. This completes the work, and final sound is laid over the picture is available at that time. The final spot is laid to tape or uploaded, satellite transmitted, or burnt to DVD.
This spot, “Pocari Sweat” (the product’s name in Japan), took several weeks of post-production effects and about 12 top-level artists to complete. This is not at all unusual, and can take much longer. For an all CG animated spot that must look photo-real, the process can take two or three months. The end result is a spot that is arresting. It will stop a viewer (even on a TIVO!) and captivate their attention, be burnt into their memories as a compelling experience, and be a topic of conversation with others. A spot that stands out due to amazing visual qualities can achieve so much that a normal one can’t, especially in the age of hurry-up and easy distraction. Visual effects are one fantastic way to bring to a viewer an experience they enjoy and remember, and to create a brand that transcends the ordinary. We relish these opportunities and collaborate on a creative and innovative level. It’s what defines a good team, and we are team players to the end.
The end.
Leslie Ekker
Visual Effects Supervisor
Digital Domain / Commercial Division
Treatmentologies:
This is a sample of a treatment combined with a methodolgy, to make it more digestible and entertaining for the client to read and understand:
Stand by… good stuff coming…
